Make a unique Valentine’s Card with Bostik!

The birth of Venus cardIt’s half term week here in Derbyshire and the kids have been here, there and everywhere! It might have been easy to forget Valentine’s Day but we’ve managed (just!) to fit it in. But who wants to make a boring old Valentine card? Certainly not us! So this Valentine’s don’t just give your loved one any old shop bought gift, give them a masterpiece of classical art (in card form). Make a unique Valentine’s card depicting the birth of Venus!

How better to say I love you than with the Goddess of love herself. The idea is all my own and I’m very pleased with it. However all the products used in this card creation were provided by the lovely folks at Bostik as I’m a Bostik Craft Ambassador in association with the Tots100.

Considering that you’re giving cardboard life to a Goddess this card is actually surprisingly easy to make and great fun for the kids. Of course I leave it up to you just how clothed you’d like Venus to be, plus the card can be as accurate or inaccurate (and fun!) a depiction of the great painting as you like. Ours is more of a loving homage 🙂

What You’ll Need:

1 Paper plate

Plain white thin cardboard

Bostik Micro Dots

Ruler

Stick on Decorations (eg foam hearts, jewels, Bostik Glitter Pens etc.)

I’ve made a little video to show you just how the card is made, but if you’d prefer text instructions then take a look below.

Step 1 – Start by taking one paper plate and folding it carefully in half.

Step 2 – Cut a triangle shape out from each end of the fold in the plate, to give the plate a shell shape.

Step 3 – Cut a piece of thin card 10cm X 1 1/2cm. Fold the card in three places: after 1/2cm, 2cm & 7cm.

Step 4 – Using some Bostik Micro Dots cut two short lengths to stick onto either end of the strip of thin card. Remove the clear backing to reveal the sticky dots.

Step 5 – Stick the card strip onto the back of the plate to make a platform and hinge for your pop-up figure.

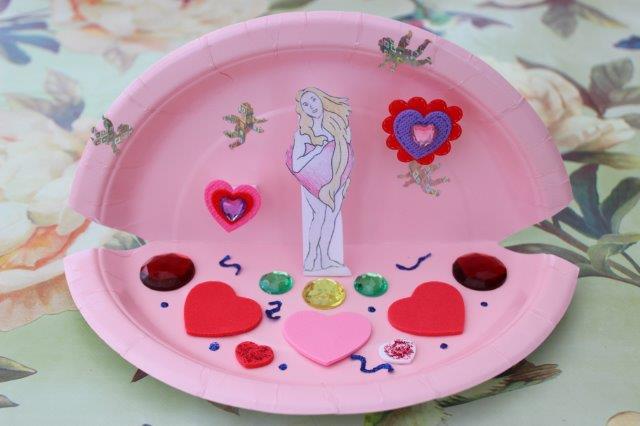
Step 6 – Draw your pop-up figure, I drew a (naive) version of the Goddess Venus holding a heart. Of course she could look however you’d like. Colour and cut out your figure.

Step 7 – Using a long strip of Micro Dots stick the figure to the pop-up hinge on the plate.

Step 8 – Cut a strip of thin card 3 1/2cm X 1 1/2cm. Create two folds, the first after 1/2cm, then again after 2cm. Cut some Micro Dots and attach to the smaller 1/2cm fold.

Step 9 – Attach a pop-up decoration to the larger 1cm fold, I used stick on foam hearts. Pull off the clear backing from the Micro Dots and attach the decoration to your plate. Make as many as you like!

Step 10 – In the original painting a Cherub flies in the air above Venus, I used a Cherub shaped hole puncher with sticky back plastic to create my own versions. I added glitter using Bostik Glitter Pens and jewels and hearts using Bostik Glu Dots.

Ta-Da one gorgeous and very unique Valentine’s card!

If you do decide to make your own plate masterpiece then please do send me an email and tag me in the post, I’d love to see how they turn out!

How to make a Dragon puppet and Goat for Chinese New Year with Bostik!


How to make a Dragon puppetMy kids and I have been having so much fun this week making dragons and goats for Chinese New Year (2015 is the year of the Goat). Every month we’re sent a box of random materials as part of the Bostik Craft Bloggers Club with Tots100. As it’s half term next week I bet you guys are looking for activities to keep the little peeps happy, so here’s how to make a Dragon puppet (or windsock) and Goat for Chinese New Year!

Dragon Puppet or windsockChinese New Year Dragon Puppet

These guys have brilliant tails which billow and twirl whether they’ve been propped up to make a windsock or used as a hand-held puppet. They’re also very adaptable which means you can use the same basic design and customise the face etc.

What You’ll Need

Bostik Glu Dots

Paper Cup

Small Polystyrene Balls

Googly Eyes

Foam

Pipe cleaner

Ric-rac or Ribbon

Tissue Paper

Lolly sticks

Sticky Tape

Photos are great when it comes to craft tutorials but I thought it would be easier for this one if I also provided you with a video showing exactly how it’s made. There are also text instructions and a couple of pics below.

Step 1 – Start by drawing and cutting out a mouth from the flat end of the paper cup.

Step 2 – Using your Bostik Glu Dots stick two polystyrene balls to the back of the cup to make eyes. Stick googly eyes on top to finish.deyebrows

Step 3 – Grab some foam (I used foam wristbands) and draw out two eyebrow shapes. Stick these onto the top of the eyes using more Glu Dots.

Step 4 – Pick up the pipe cleaner and fold in half to make the Dragon’s horns. Stick between the eyes using Glu Dots.

Step 5 – Take a short length of foam and fold the ends into the centre to make nostrils. Secure using Glu Dots.

Step 6 – Cut half a moustache out from foam, repeat to make a second half. Cut ric rac or ribbon to the same length or a little longer and use a Glu Dot to stick on top of the moustache.

Step 7 – Stick the nostils onto the thinner end of the paper cup using a Glu Dot. Then stick the moustache into place just under the edges of the nostrils.dface

Step 8 – Next cut a length of foam (or half a wristband) and stick to the paper cup behind the nostrils to make the bridge of the Dragon’s nose.dtissuepaper

Step 9 – Take some tissue paper and stick to the inside of the paper cup using sticky tape. We also cut out thinner lengths of tissue paper from a contrasting colour to make streamers, stick to the cup.

Step 10 – This next bit is for the adults!! Cut two small holes in the bottom of the Dragon’s face and insert two lolly sticks. Add a third which is placed between the first two and bind together using sticky tape.

Play with your Dragon!

GoatChinese New Year Goat craft

This little guy is really cute and very quick to make!

What You’ll Need

Bostik Foam Pads

1 Polystyrene Ball

Wool

Cardboard

Pipe Cleaner

Pens

goat1

Step 1 – Pick up your polystyrene ball and attach the end of a ball of wool using a Bostik Foam Pad.

Step 2 – Wind the wool round and round until the ball is completely covered. Secure the end by tucking under the wound wool. You can use another Foam Pad or a Glu Dot if needed.goat2

Step 3 – Cut a pipe cleaner into four pieces and bend one end of each piece to make feet. Push these into the ball.goat4

Step 4 – Draw a face for your Goat onto cardboard. Cut out.goat3

Step 5 – Stick onto the front of your ball using Foam Pads and ta-da you have your Goat!

How to make an Easter Bumble Bee and Easter Rabbit Tutorial

IMG_7751In my last post I showed you a collection of our recently completed Easter Crafts as part of the Bostik craft network. Today I’ll show you how to make an Easter Bumble Bee and Easter Rabbit with our simple and fun tutorial.

You will Need

Polystyrene Egg shapes

Googly Eyes

Bostik Glu Dots

Pens

Ribbon

Pipe Cleaners

Buttons

Pom Poms

Sheets of craft foam

Bumble Bee

IMG_7716Start by colouring in one of your egg shapes yellow with black stripes.

IMG_7720

Next take two pieces of pipe cleaner (a colour of your own choice, we used purple) and bend into wing shapes. IMG_7721

Take another four lengths of yellow or orange pipe cleaner and bend to make legs, obviously if you want a technically correct bee he should have six legs, but four fitted in much more neatly.IMG_7722

Push the leg pieces into one side of the coloured polystyrene egg shape. Push the wing shapes into the opposite side.

Finally stick some large googly eyes to the front of your bee, and push a small length of yellow pipe cleaner into the end to make his stinger!IMG_7736

Rabbit

Begin by colouring in a polystyrene egg shape in a colour of your choice.IMG_7723

Next take a length of ribbon and fold as shown in these pictures to make the rabbit’s ears. Attach the ribbon ears to the thin end of your egg shape using a Bostik glu dot.IMG_7725IMG_7728IMG_7729

Next stick on two googly eyes to the front. Then using a Bostik glue dot stick a button on to give the rabbit a nose, you can draw the whiskers on using a felt tip pen.

IMG_7737

To allow your rabbit to stand up unaided he will need some feet! Cut feet shape from your craft foam and attach to the base of your bunny using a Bostik glu dot.

Finally give your rabbit a lovely cotton tail by attaching a pom pom with a Bostik glu dot to his back.

IMG_7739

IMG_7748