Monster Head Wall Art with Bostik

bostikmon9Rarrrrrr! Did I scare you all? Probably not but pretending to be a scary monster is one of those essential parts of childhood. Why not combine all the thrill and amusement of shocking the family with a craft activity. Try out my Monster Head Wall Art tutorial and your little ones are bound to have a roaring good time! This blog was made from supplies given to me by Bostik as part of their Craft Ambassador program, search Bostik on the side bar to see some of my previous Bostik crafts.

bostikmon1What You’ll Need

Bostik Glu Dots

Blu Tack White Glu

Cardboard cone (buy a blank one from a craft store or make one)
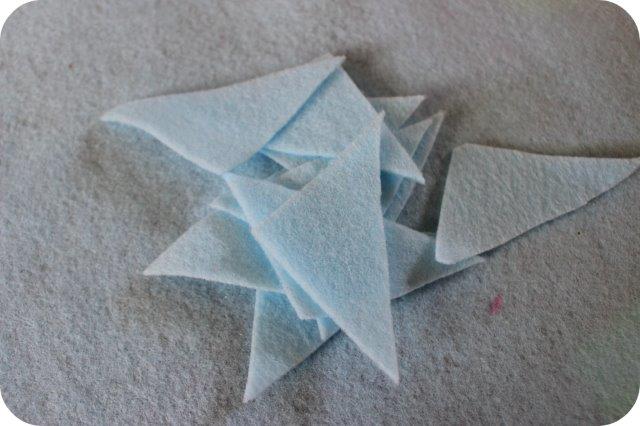
Piece of felt

2 Polystyrene balls

Pompoms, feathers, foam shapes or anything you fancy to decorate your monster pal

bostikmon2Step 1bostikmon3

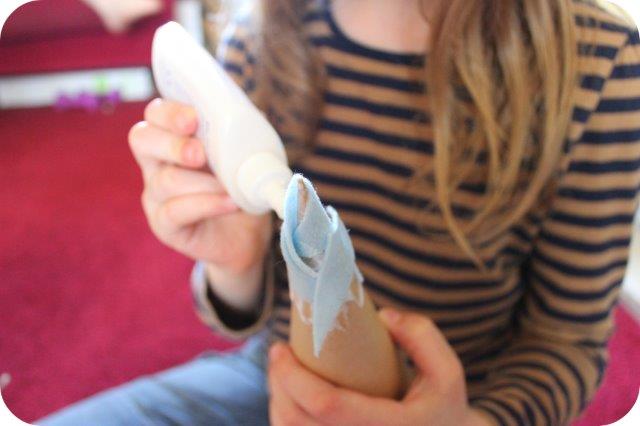
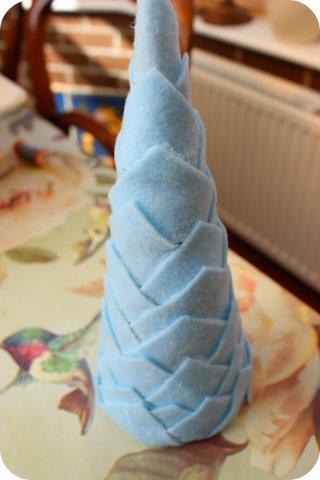
Every self respecting monster needs terrifying skin, cut some shapes from the felt and glue onto the cone using the Blu Tack White Glu, then leave to dry completely. My daughter cut out triangle shapes and glued them from the tip of the cardboard cone to the back to create scales.

bostikmon4

Step 2bostikmon5

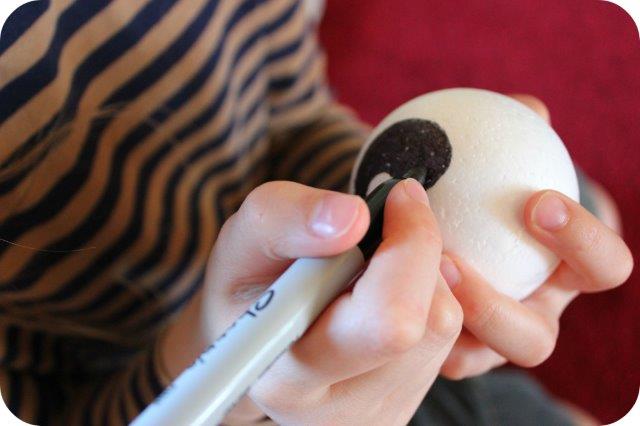
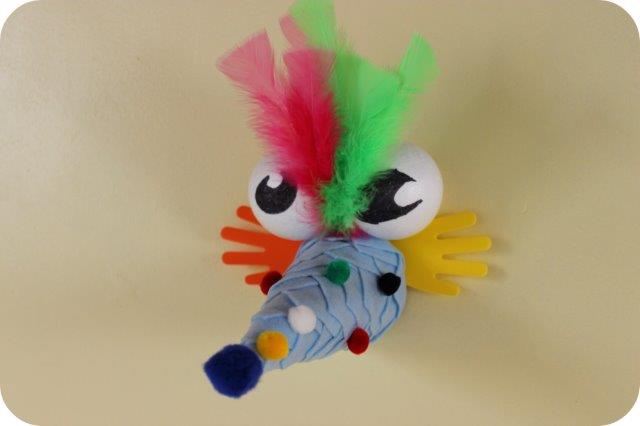
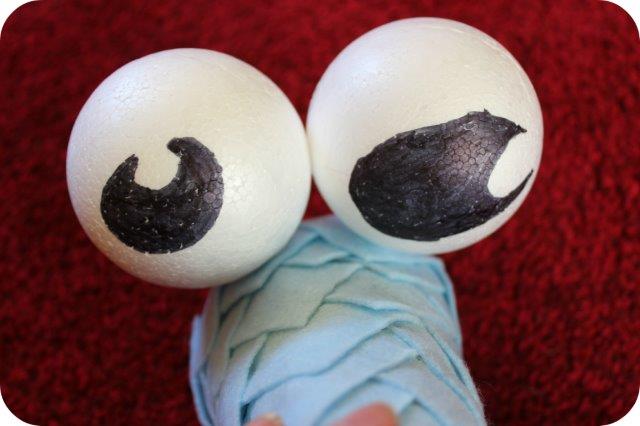
Draw some pupils onto the two polystyrene balls, these will become your eyes. Stick the eyes together using a Bostik Glu Dot. Then attach two glu dots to the bottom of each eye and stick onto the end of the cone.

bostikmon6

Step 3

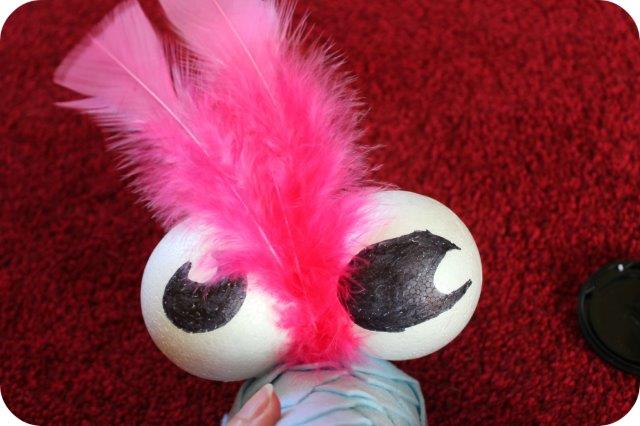
Time to decorate and let your imagination run wild!! We stuck foam hand shapes to the back of our monster’s head. Then we used wired feathers which were bent at a right angle and threaded between the eyes, these were stuck inside the cone using tape to give a really secure anchor. Small pom poms were stuck at random around the head using glu dots, and then we stuck a larger fluffy pom pom onto the tip of the cone/head to give the monster a bright blue nose.bostikmon8

Of course you could decorate your monster in whatever way you fancy.

bostikmon7

Step 4

To hang the head on the wall simply position over a nail or picture hook (that may be a job best left to the parents if hammers are involved!!) then stand back and admire your monstrously good craft skills.bostikmon9

Fishing Game Craft Tutorial with Bostik!

fishinggametutorialYar, good morning to ye me fine readers, we be feeling all nautical here at the Angel Eden Blog today so I’m sharing our quick and simple Fishing Game craft tutorial. We created this fine fellow of a game using craft supplies from those land lubbers at Bostik as I’m a Bostik Craft Ambassador  ‘Pirate’! It be perfect for small hands and trainee sailors to make and play, sure to be enjoyed by any true lover of the sea.

What ye be needing

Empty cardboard box

Shiny card and cellophane

Bostik Blu Tac Blu Stick

Foam fish (stickers are perfect)

Stickers for decoration

Cardboard

Pipe cleaner


bostikocean1Step 1

Start by cutting off the top flaps from the cardboard box.

BostikOcean2-3Step 2

Cover the bottom of the box with a piece of shiny cardboard (the sea bottom). Secure this into place with the Bostik Blu Stick. This glue goes on blue and dries clear making it really easy to see when applying. We used blue cellophane to stick to the sides of the box, you could also use cardboard or colour it in with a pen.BostikOcean4Step 3

Finish off the sea bottom by cutting wavy seaweed from green cardboard, glue into place.BostikOcean5Step 4

We used sea themed stickers to add creatures to the bottom of the sea.BostikOcean6Step 5

Now to make the fish! We used foam fish stickers which is definitely the easiest option. Cut a small length of cardboard, remove the sticky back from the fish and attach one edge of the cardboard strip. Bend the cardboard around the front of the fish and secure the other end at the back. Then stick the entire fish onto blue cardboard and cut around. Write a random number onto the back of the fish (this will be the amount of points the catch is worth).BostikOcean7-8

BostikOcean9-10

Step 6

To make the fishing rods just bend the end of a pipe cleaner into a U shape. Decorate the outside of the box however you like (we used foam stickers and pens). That’s the game completed, now it’s time to play!BostikOcean11BostikOceanSide

How to Play!

Undoubtedly the most important element is how you play our fishing game. There are two versions of this game depending on the age of the children or how hard you want it to be.

BostikOcean12Easy Version:

Each player takes it in turn to ‘fish’ a creature from the sea. Once all fish have been caught they are turned over to reveal how many points they are worth. The winner is the fisherman with the most points.

BostikOcean13Harder Version:

Exactly the same as the version above except that players wear a blindfold during their turn so they can’t see which fish they are hoping to catch. We gave each player a couple of swipes in the box and if they caught nothing then that was the end of their turn.

Last Minute Easter Crafts for Kids with Bostik!

IMG_1824Yey it’s the Easter holidays! There’s kids to entertain, chocolate to buy (or make), relatives to feed and before you know it you’ve forgotten the crafts and the children are bored!! If you have found yourself in this situation then fear not because we’ve got some really quick and easy last minute Easter Crafts that are sure to please.

As a Bostik Craft Ambassador I am sent a new box filled with crafty goodies every month. This month I gave the kids free reign to create their own crafts and this is what they came up with. 🙂

Easter Monster (or chick if you’re feeling traditional)

You will need:

Bostik Glu Pen

Bostik Tape Discs

Polystyrene egg

Shredded tissue paper

Googly eyes

For the Nests:

Hessian fabric pieces

Raffia

Cardboard box lid

Needle and thread


IMG_1813

Using the Bostik Glu pen cover the egg shape with a thin layer of glue.

Throw/ chuck or coat the gluey egg in shredded tissue paper. Squash the paper together to make sure all the white spaces are covered.eggmonster

Trim off the excess pieces of tissue paper with scissors until your monster or chick looks perfect. Finish him off with a pair of googly eyes and if you’re making a chick add a foam or felt beak.

IMG_1818

Of course every Easter creature needs a good nest to live in and we have two ways to make him or her their brand new home.

First Nest

IMG_1811

Take the lid of a cardboard box and place into the centre of a piece of hessian fabric. Using Bostik Glu discs secure the hessian into the lid by folding and sticking into the centre.

Second Nest

IMG_1820

Take another piece of hessian and sew a rough circle shape using large stitches. Pull the ends together to gather the material and tie in a secure knot. Stuff pieces of raffia under each of the stitches to pad out and fill the nest.

IMG_1821

Finally display proudly on your fireplace and have a lovely chocolate filled weekend 🙂