 I have always had a fascination with mice, the stuffed variety that is not the ones that live in the skirting boards and leave holes everywhere!
In issue 11 of Mollie Makes magazine there was a a pattern to make a trio of cute mice from scraps of fabric. I couldn’t have been more happy!
I barely had the magazine home two seconds before I eagerly started to make the larger mouse, complete with pretty summer dress and cardigan.
The pattern for the dress can be found in Mollie Makes Issue 11 and the instructions for the cardigan can be found on the blog
of the designer
I also I wanted a way to display my little mouse. She was obviously very refined, so it seemed only fitting that she had a beautiful bed to recline in. As she needed to lie down I did make a tiny alteration to the Mouse pattern, choosing to join her legs to the bottom of her body rather than her tummy as the original pattern stated.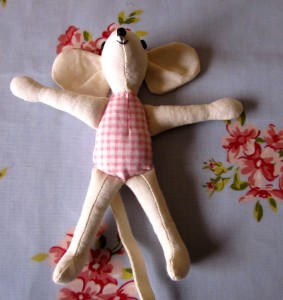
I made the bed from cardboard, masking tape, newspaper, PVA glue and paint. I also made a mattress, pillow and blanket.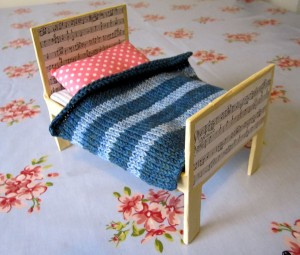
The side pieces of the bed were cut from thick card. The card was from the back of a child’s sketchbook, but mount board would do just as well.
The two ends were cut with the headboard being larger than the bed end.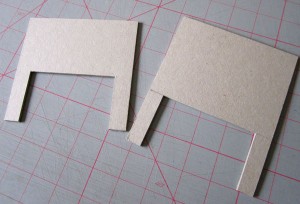
The headboard measures 12cms X 14cms.
A rectangle measuring 9cms X 5cms was cut from the end to make the shape of the two legs.
The bed end measures 12cms X 12cms and then a rectangle cut from the bottom the same size as the headboard end.
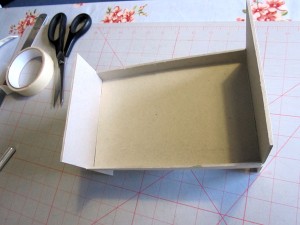
The base of the bed was cut from the same card. This piece measured 15cms X 18cms and a line was drawn along each long size 1 1/2cms from the edge. This line was scored with knife so the it could be folded up to make a base that a mattress could sit in.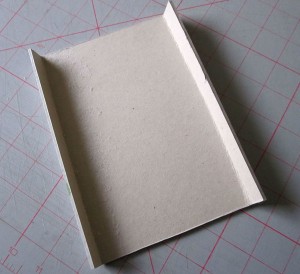 The pieces of the bed were taped together with masking tape. It’s a
good idea to use plenty of tape so that the bed feels firm.
 I now cut strips of newspaper and glued these onto the bed to give
extra strength. PVA glue works well for this stage.
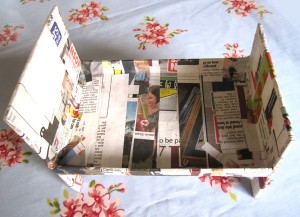 I carried on pasting paper until the whole bed was covered. I then reinforced by sticking on a further layer before allowing the glue to completely dry, usually about 24 hours.
Once I was satisfied that the bed was dry and felt nice and firm, I painted it with a small tester pot of emulsion paint in a cream colour. I found I needed three coats of paint to completely cover the newspaper print.
To give some pattern to the bed ends I cut some paper from some old music to paste on the ends. The pieces for the headboard end were 11cms X 7cms. The size for the foot end were 11cm X 5.5cms.
Once these pieces were dry I varnished the bed with two coats of quick drying gloss varnish.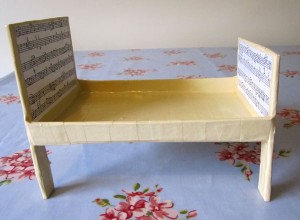
Now to make some bedding. Firstly I made a mattress to fit inside the edge pieces. I cut 2 rectangles of fabric from some striped fabric and one piece from some wadding. These rectangles measured 14cms X 20cms. The two pieces of striped fabric were placed right sides facing with the wadding place underneath. I used a 1cm seam allowance and stitched around the edges leaving a 5cm gap at one of the shorter ends. I trimmed some of the fabric off at the corners and turned the mattress the right way out. On the side with the gap the fabric was tucked under and that edge sewn across to complete.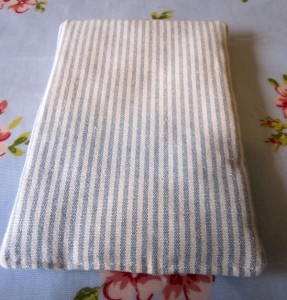
I decided to use a small scrap of pretty pink fabric for the pillow. Two rectangles were cut measuring 13cms X 8cms. These were placed right sides facing and sewn around leaving a gap on one of the shorter sides to turn out the right way. Once complete I turned this was stuffed with a small amount of toy stuffing and the gap sewn shut.
Finally the blanket was knitted by casting on 40 stitches with DK wool using size 4mm needles. I used two different colours to give a striped design. The blanket was knitted in stocking stitch, alternate rows of knit and purl. The stripes were as follows; 8 rows dark blue, 4 rows pale blue, 6 rows dark blue, 4 rows pale blue, 6 rows dark blue, 4 rows pale blue and finally 8 rows dark blue.


6 Responses to Mollie Makes Mouse Bed Tutorial