
I love collecting buttons and use them to add interest to items of clothing, shoes, cushions, and in jewellery projects. I always look for them when on holiday and usually come back with several little bags of goodies. I have noticed that in Europe you still seem to be able to find shops with walls lined with interesting and unusual buttons. The last place I bought any was Bratislava in Slovakia. This is a very small city especially the old centre and yet I was able to find several items to bring back. I also have buttons from fabulously interesting shops in Prague. These shops tend to have the feeling that time has stood still and they are there to cater for customers who are still making their own clothes and household items.
I enjoy visiting Italy and have buttons from Florence, Venice, Bologna and many other places. On our last trip to Florence we took a train to a very small town call Lucca and as soon as I got there I started to ask the locals if there were any shops selling buttons. I was advised that a shop called Casa de Buttoni (The House of Buttons) was located just outside the old town walls. It was one of those amazing little shops with the walls lined with brown boxes with a sample button fixed on the front of each box. I bought a selection of mother of pearl star buttons with the intention to use these for jewellery projects, you can see the results here Star Earrings. Because of the exchange rate they did not seem cheap, in fact they seemed rather expensive but I had been looking for this design for a long time so bought a good selection of sizes.
To get back to buttons, I have found an antique shop in Bath that sells cards full of vintage buttons but I don’t find many sources of interesting buttons in town centres. I have bought some off eBay but it is not the same pleasure as being in a shop with all those enticing buttons. I have made button bracelets from small buttons and waxed cotton and will add the instructions at the end of this blog. The buttons that I have used for these bracelets were a good find at a Derbyshire Mill that used to make items for Marks and Spencer. They were selling off the buttons cheaply and I bought up most of their supply.
TUTORIAL
You will need enough buttons to stretch comfortably round your wrist, probably about 14, each measuring about 1 cms across. For this style of bracelet they need to be buttons with four holes.
You will also need a length of waxed cotton or good quality string. Cut the waxed cotton to a length of about 80 cms and fold in half. Tie a single knot in the folded end to form a loop. Before pulling this tight make sure that your loop is the right size for one of the buttons to pass through, be careful however to make sure the loop is not too large as this may cause the bracelet to come undone.
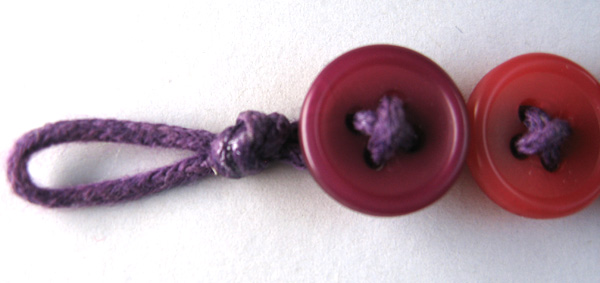
To make it easier to thread the buttons you could now fix the looped end to your table with some masking tape. Have the two loose ends of cord facing you and thread through two of the holes in the button from behind, with the cord coming out at the front. Cross the cord and thread diagonally through the other two holes in the button from the front to the back and pull tight.
Repeat the previous step with as many buttons as you need to go round your wrist.
Once you have the correct length tie a reef knot behind the last button. A reef knot is achieved by passing the right hand cord over the left and passing it under to knot and then passing the left cord over the right and under to give a second knot.
Pull the knot tightly. If you have any suitable glue it is a good idea to place a little glue on the knot. Once this is dry cut the ends and your bracelet is finished.

The loop that you made at the beginning will now be used to go over the last button to fasten the bracelet. Your done!

Tutorial by Anne


2 Comments (Leave a comment)