Crochet Phone Case Pattern tutorial

phone-cases
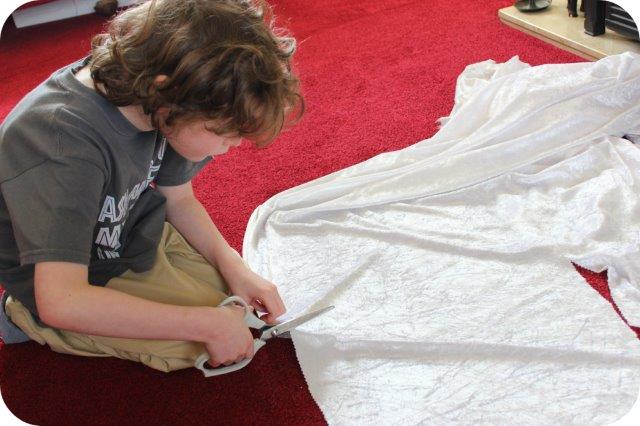
Crochet and knitting have been experiencing a fashionable revival in recent years, there’s even been quite a few celebrities getting in on the fun. Whether you are an avid Knitter, Crocheter or general Hobbyist, then chances are you have a stash of threads/wool left over from previous projects. But there’s no need to consign them to the rubbish bin, with todays Crochet phone case pattern.

I actually wrote this pattern several years ago for the Boden Community  but I think it would make a great homemade present so thought I’d share it again today.phone-in-case

We all seem to live our lives through our mobile phones and Crocheted phone cases are not only pretty, they’re practical too! First they help to protect your screen, second they don’t muffle the ringing tone as solid cases can.

What You’ll Need

Left over DK Wool or DK Cotton yarn

A Mobile Phone

3.5mm Crochet Needle
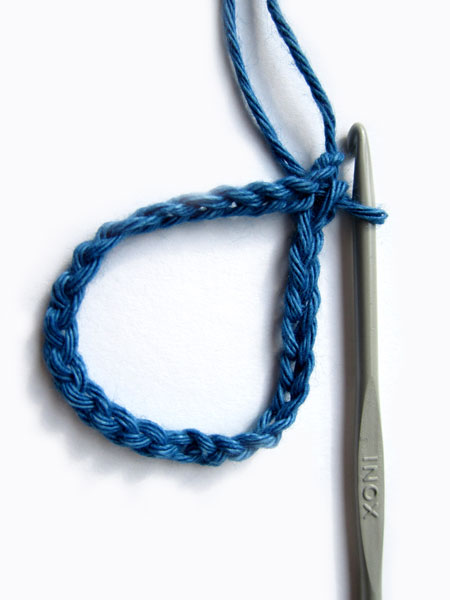
chain

To Begin

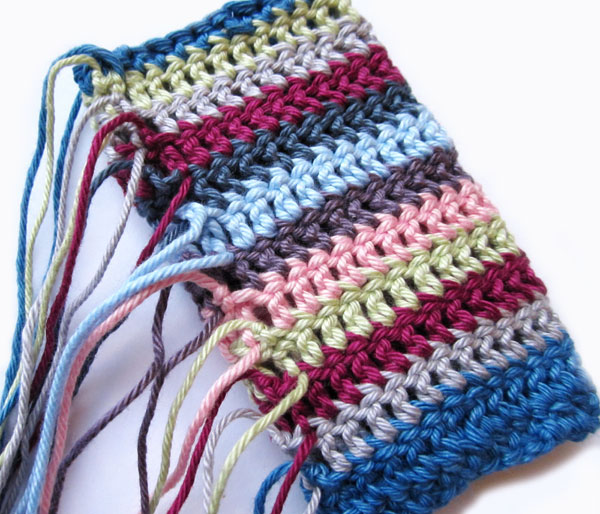
Begin by making a chain long enough to go right around your phone. Mine was 26 chains and then use a slip stitch to join into a ring.First-colour


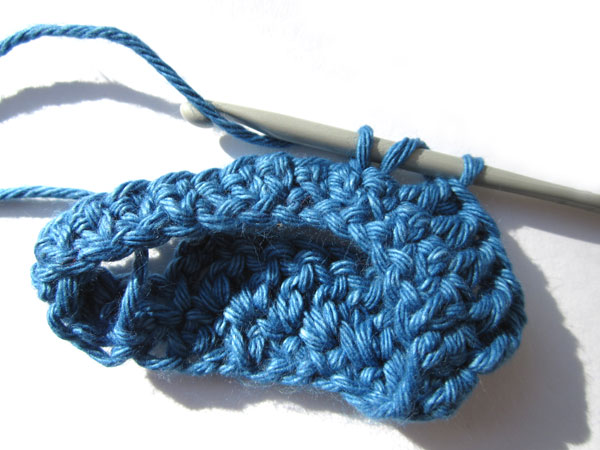
Round 1ch 1, 25 dc, (this is one dc into every chain stitch), then sl st into first chain to close up the circle. Round 2ch 3 and then work 1 tr into each stitch until you have completed the circle and then join with a sl st. Round 3Join second colour into top of any tr st from last round, ch 3 and the work 1 tr into each stitch until you have completed the circle and then join with a sl st. Rounds 4 – 13. Join in new colours , ch 3 and then work 1 tr into each stitch until you have completed the circle and then join with a sl st. You may need to adjust the amount of rounds you complete here depending on the size of your phone.
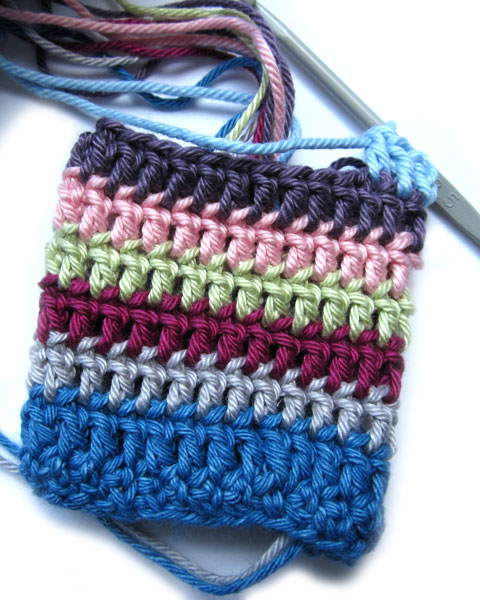
strips


Last Round 

ch 1, dc into each stitch of the last round and join with a sl st.

endsSewing Up

To sew up, turn your phone case inside out and use a large needle to weave in all the loose ends. To close the bottom of the case, sew along the edge with an over sewing stitch.

Once all ends are sewn in, turn the case the right way out. To close, sew on a button and then join the yarn to the top edge and make enough chain stitches to be fit over the button.

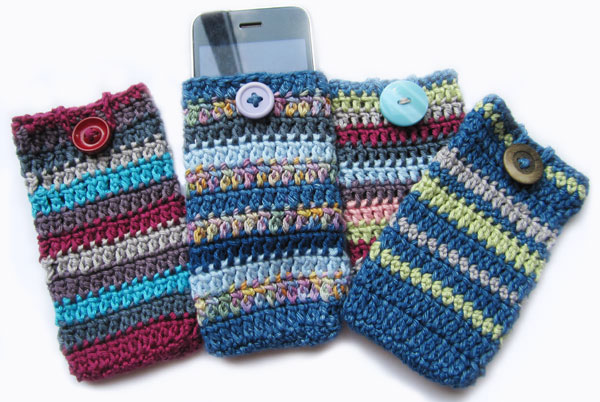
Mine was 18 chain stitches. Finally weave in these ends and place your phone in its smart new case. Here are some more examples of cases I have made.


ABBREVIATIONS:

ch: chain dc: double crochet sl st: slip stitch tr: treble crochet


Make your own Ice Skating Snowman Theatre

icetheatreThere’s snow doubt about it Winter is coming! *Excuse me while I laugh heartily at my multiple clichés and puns :D* The nights are drawing in and the weather is super nippy so why not cosy up and get crafty with the kids. Today’s tutorial to make your own ice skating Snowman theatre is a fun way to embrace the season while keeping warm! It was made using materials provided by Bostik as part of their Craft Ambassador program.

Full instructions to make the theatre are included in this video but I’ll also pop text instructions below.

What You’ll Need

Bostik Blu Tack Foam Pads

Bostik Micro Dots

Bostik White Glu

A cardboard box

Foam or paper to decorate the sides

Blue card

Tracing Paper

Foam

Snow themed stickers

Fluffy Balls (or pom poms)

Polystyrene Star

Glitter

Lolly sticks

Thread

Tape


Step 1

Start with a cardboard box, stick back 3 flaps with tape, leave one flap open.

Step 2

Decorate the sides & back using foam (or paper) stick into place using the Bostik Foam Pads.

Step 3

To make the frozen lake (ice-rink) use a blue sheet of cardboard with a piece of tracing paper laid on top. Cut shapes out of foam to make the edge of the lake, add white foam on top to represent the snow. Stick into place using Bostik Micro Dots or White Glu.

Using Foam pads stick the ice-rink to the open flap of the box

Step 4

Cut a slit into the back of the box, then decorate the interior using stickers. To add further decoration I stuck fluffy balls (snow balls) to the scene using foam pads.

Step 5

Cover a polystyrene star with Bostik White Glu, then sprinkle over glitter. Once dry stick to the back of your scene using foam pads.

Step 6

Now to make the snowmen. Stick fluffy balls (or pom poms) on top of each other and then stick to a lolly stick.

Step 7

Tie thread around some sparkly pom poms and stick to the top of the theatre using foam pads.

Finally paint the outside of the box, slide your snowmen through the gap at the back and you’re ready to play!


Halloween Ghost Decoration Craft for Kids

halloweenbosmain

Boo!! Did I scare you?? Probably not but as Halloween is nearly upon us I thought I better give it a go. I’ve never been keen on the gory side of Halloween and my children don’t particularly like being scared but we’re all for Pumpkin carving, apple bobbing and other child friendly activities. As a Bostik craft ambassador I get to create child-friendly crafts every month, so this month it had to be a Halloween Ghost Decoration Craft for kids. This one (made by my son) has been named ‘Bounce!’

To make your own spooky pal you’ll need

Some fabric

Polystyrene ball

Bostik Glu dots

Bostik Sew simple glue

Buttons

Felt (to make a mouth)

Decorations – we used pumpkin ribbon and fusible beads

Elastic cord

Keyring

halloweenbos2

Step 1

Start by cutting a rough square out from a piece of fabric. We used pinking shears as it prevents fraying and give the ghost a wiggly edge. Turn the fabric over so that the wrong side is facing up.

halloweenbos3Step 2

Nest cover half of the polystyrene ball with Bostik sew simple glue. Stick into the centre of your fabric and then gather the fabric around to stick into place.

halloweenbos4Step 3

Using a cocktail stick or sewer make a hole through the fabric into the polystyrene ball (might need an adult to do this bit). Stick in some elastic cord using the sew simple glue. We used black cord so that it wouldn’t show up at night. Now leave to dry.

halloweenbos5Step 4

Stick two buttons onto the fabric using Bostik glu dots. We used one larger and one smaller and two different colours to give our ghost a bit of character!

halloweenbos6Step 5

We used a moon shaped felt sticker to make the mouth, you could of course cut one out.

halloweenbos7Step 6

It’s time to decorate! My son cut small pumpkins off pumpkin trimming and stuck to the ghost using the sew simple glue.

halloweenbos8Step 7

Next he made some simple shapes from glow in the dark fusible beads (which Mummy ironed!) and these were stuck to the ghost using Glu dots.

halloweenbos9Step 8

Tie the elastic cord onto a keyring and your new friend is ready to play!