Squashed Rat Bookmark Knitting Pattern

Squashed Rat Bookmark Knitting Pattern
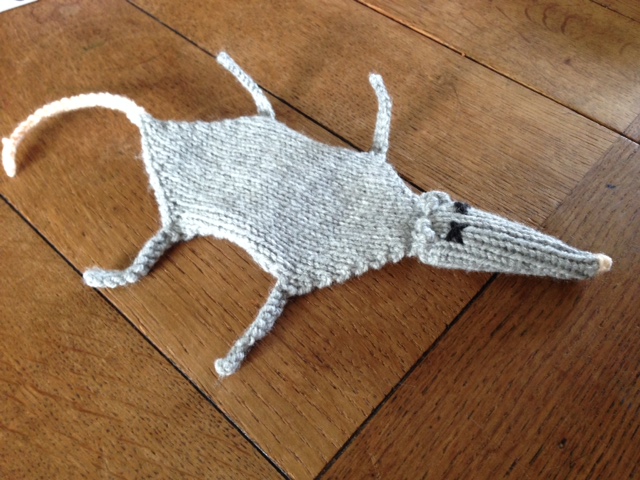
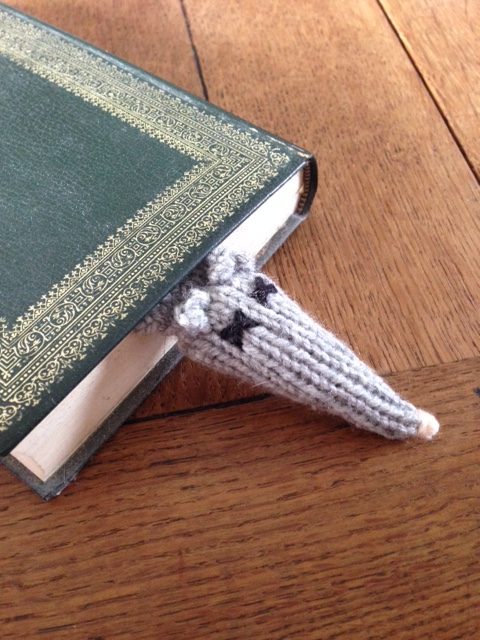
It’s a truth universally acknowledged that everyone loves rats!! Yes, no, maybe!? Whether you love the little critters or not (I imagine it all depends on if we’re talking about the pet or wild variety) I think we can all agree that squishing them inside books equals fun. I can’t claim the original idea as my own unfortunately, nor can I remember where I first saw it but today’s pattern is all my own creation. So if you fancy squishing rats inside your favourite reading materials then give my Squashed Rat Bookmark Knitting Pattern a go!

Squashed Rat Bookmark Knitting Pattern

What You’ll Need:

Grey or brown wool

Small amount of black wool

Small amount of light pink/peach wool

Small amount of stuffing


Pattern

Using 3mm needles cast on 2 stitches in grey/brown.

Knit 1 row

Increase into each end stitch 2 times (6 stitches)

St-st 3 rows starting pearlwise

Increase at each end k wise

St-st 3 rows

Increase each end k wise

St-st 3 rows

Increase each end k wise

St-st 3 rows

Increase each end k wise

Pearl next row

Increase each end k wise

Pearl row

Increase each end k wise to 18 stitches

Pearl row

Cast off 6 stitches, knit 6, cast off 6

3 -stst rows starting p

Increase each end k wise

Pearl

Increase each end k wise

P

Increase each end k wise

P

Increase each end k wise

P

Repeat to 18st

P

Cast on 12 stitches, cast off then knit across original stitches

Cast on 12 p wise, cast off then p across original stitches

St-st 18 rows

Cast on 12 stitches, cast off then knit across original stitches

Cast on 12 p wise, cast off then p across original stitches

K2tog, knit to last 2 st then k2tog

Pearl row

Repeat last 2 rows until 2 stitches remain, attach pink/peach for tail

St-st 20rows

K2tog

Cast off.

Bring the two sides of the head together and stitch leaving the back open, lightly stuff before closing.

Stich on eyes using black wool and making cross shapes.

Stich nose using pink/peach wool

The ears are made by stitching a large stitch in grey on the top of the head and then blanket stitching around this stitch about 5 times.


Holiday Memories Craft with Bostik

holiday memories craftTodays holiday memories craft tutorial is the perfect way for kids (or adults) to turn all those little mementoes into a hanging wreath to decorate your home.

If your family is anything like mine then you often come home with all kinds of bits and pieces like teeny tiny shells, postcards or even bits of sand. But what do you do with them when you get home? Getting crafty is one way to use those special collections and a door hanging means everyone can appreciate the fun you had. I received the materials used in this craft as part of the Bostik Craft Ambassador program.

What You’ll Need

Cardboard

Foam

Bostik Fine & Wide Glu Pen

Sand

Lolly Sticks

Wooden holiday shapes

Fabric Stickers

Small Shells

Ric rac or ribbon

Small bunting flags

Bostik Glu Dots

Sticky Tape

All the instructions you need are contained in this video or you can follow the text version below.

Step 1

Begin by drawing around a dinner plate onto a piece of cardboard. Draw a smaller circle in the centre (I drew around a roll of tape). Then cut out.

Step 2

Using the Bostik Fine & Wide Glu Pen cover the back of the wreath shape in glue (use the wide end of the pen). Then stick onto a piece of foam or you could use some strong cardboard. Once dry cut out.

Step 3

Using the fine end of the glu pen make swirls, dots or any pattern you fancy all over the front of the shape. Then pop some sand into a cup and sprinkle all over the glue pattern. Once the glue has dried shake off the excess sand.

Step 4

Time for decoration! You can use anything that you collected or that reminds you of your trip, I like to lay everything out before sticking into place. I used Bostik Glu dots to attach plain wooden holiday themed cut outs. Of course you could decorate these, I just think the bare wood looks really good. Next I laid lolly sticks to remind us of all those lovely iced treats and fabric stickers look great, especially if they have googly eyes!

Step 5

Bunting screams summer to me so I made some bunting using ric rac and ready made flags. If you can’t find any pre-made flags an alternative is to cut triangles from fabric and either stick into place or use a hole punch to loop the ric rac or ribbon through. The bunting was stuck to the reverse using sticky tape.

Step 6

Finally I stuck some miniature shells into place using glu dots. Then I used more ric rac to make a hanging loop, this was also stuck to the reverse of the hanging using tape.

Step back and admire your handy work!

Monster Head Wall Art with Bostik

bostikmon9Rarrrrrr! Did I scare you all? Probably not but pretending to be a scary monster is one of those essential parts of childhood. Why not combine all the thrill and amusement of shocking the family with a craft activity. Try out my Monster Head Wall Art tutorial and your little ones are bound to have a roaring good time! This blog was made from supplies given to me by Bostik as part of their Craft Ambassador program, search Bostik on the side bar to see some of my previous Bostik crafts.

bostikmon1What You’ll Need

Bostik Glu Dots

Blu Tack White Glu

Cardboard cone (buy a blank one from a craft store or make one)

Piece of felt

2 Polystyrene balls

Pompoms, feathers, foam shapes or anything you fancy to decorate your monster pal

bostikmon2Step 1bostikmon3

Every self respecting monster needs terrifying skin, cut some shapes from the felt and glue onto the cone using the Blu Tack White Glu, then leave to dry completely. My daughter cut out triangle shapes and glued them from the tip of the cardboard cone to the back to create scales.

bostikmon4

Step 2bostikmon5

Draw some pupils onto the two polystyrene balls, these will become your eyes. Stick the eyes together using a Bostik Glu Dot. Then attach two glu dots to the bottom of each eye and stick onto the end of the cone.

bostikmon6

Step 3

Time to decorate and let your imagination run wild!! We stuck foam hand shapes to the back of our monster’s head. Then we used wired feathers which were bent at a right angle and threaded between the eyes, these were stuck inside the cone using tape to give a really secure anchor. Small pom poms were stuck at random around the head using glu dots, and then we stuck a larger fluffy pom pom onto the tip of the cone/head to give the monster a bright blue nose.bostikmon8

Of course you could decorate your monster in whatever way you fancy.

bostikmon7

Step 4

To hang the head on the wall simply position over a nail or picture hook (that may be a job best left to the parents if hammers are involved!!) then stand back and admire your monstrously good craft skills.bostikmon9