Needle Case Sewing Tutorial!

It’s all well and good having a hobby like sewing, but where do you keep your supplies inbetween projects? There’s absolutely no reason you shouldn’t store your equipment in style and make that storage yourself. So today I am bringing you our Needle Case Sewing Tutorial.

I’ll start by introducing you to one of my favourite design teams from Derby Massey & Rogers. I’ve loved their designs for several years, I received one of their bags as a gift a couple of years ago and it’s been a favourite ever since. We were also lucky enough to get our mitts on some of their fabric scraps which we turned into small gifts. Thankfully they now sell these fabrics by the metre so everyone can enjoy their handiwork.

What You’ll Need

1 Rectangle of Outer Fabric 19x13cm

1 Rectangle Lining Fabric 19x13cm

1 Rectangle Thin Wadding 19x13cm

Felt or Woolen Material

Tape or Ribbon

2 Small Buttons

Thread

Step 1

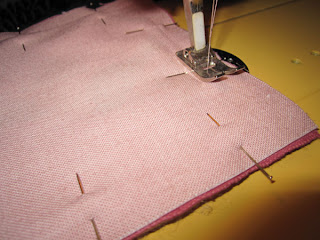
To begin cut out the three rectangles of outer, lining and wadding fabrics. First take your outer fabric and lay the lining fabric on top (right sides together) then lay the wadding on top of the lining fabric. Pin the three layers together.

Step 2

Machine or handsew about 1cm from the edge through all three layers. Remember to leave a gap so you can turn the fabrics the right way out.

Step 3

Cut the corners diagonally so that when turned right way out you have nice flat seams. Trim your seams if necessary.

Step 4

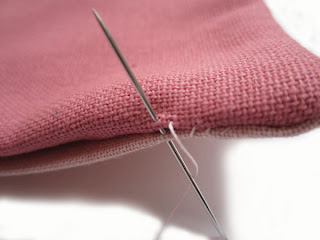
Turn the layers the right way out. Iron all the seams and then handsew closed the open edge.

Step 5

Next cut two pieces of felt or woolen material. Ours measured 15x9cm. Attach these to the centre of your needle case by sewing a running stitch through the felt/wool and the sewing case.

Step 6

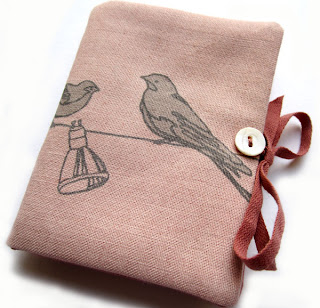
Attach some tape or ribbon to either side so you can keep the needle case closed. We decorated with a small button to hide the stitches.

Congratulations you now have a very stylish needle case!
Pretty Little Cozies! Book Review

Most people own a beautiful tea cozy, even if you never use the pot beneath it. You probably also cover your mobile, mp3 player, tissues etc etc. You name it, we cover it. Mainly I think this is to inject a bit of our own personality into objects which often lack any. If you’re a creative person you probably prefer to make such covers yourself. I was therefore delighted when I received a copy of Pretty Little Cozies by Lark Books from GMC Publications.

The book features 32 projects to makes various cozies/pockets and is written by a selection of designers. It begins with a very useful section on cozy basics. This includes materials required and techniques which are covered. I found the explanations and drawings to be clear and easy to follow.

If you’re a regular reader then you will know that we always review books by actually testing them out. So I started by making a cover for a packet of tissues, seen here. It came out so well that I intend it to be a present for a relative.

There are many designs in this book and they are quite varied covering everything from a games controller cover to a pan handle cover. Once I had completed one project successfully I was eager to try out another as soon as possible.

So next I tried out the camera case. I used vintage fabric for this project and I think this is one area where the book really excels. All the designs are small enough that you will probably be able to make them from scraps of fabric you already have. Personally I find nothing more satisfying than being able to launch straight into a project without having to hesitate while I stock up on supplies.

I also made a mobile phone case out of the same fabric and again I’m very pleased with the results.

Would I recommend this book? Definitely! It has so many projects that there’s bound to be one or two that will inspire you. There are also many ideas for gift giving.

Could it be improved in anyway? Not really. The only suggestion I would have and this is based purely on my own personal taste, is that I thought some of the projects looked slightly old fashioned. Largely due to the fabric choices used. But as I say this is only my own preference and really does not affect the quality of the book or the designs it contains.

Book Details

Title: Pretty Little Cozies

Author: Lark Books

ISBN: 9781600593765

RRP: £12.99

Publisher: Lark

Publication Date: July 2009.


Oat Biscuit Cookie Recipe!

Happy Pancake Day everyone! As I’m sure you’re all well prepared for cooking pancakes later, I thought I’d bring you an alternative recipe, one that I wont be giving up for lent (as it’s just too yummy!) So today I am bringing you our Oat Biscuit/Cookie Recipe!

What You’ll Need

4ozs / 100g Plain flour

4ozs / 100g Margarine

1/2 level tsp Baking powder

4ozs / 100g Caster sugar

Large pinch Cream of tartar

4ozs / 100g Rolled oats

1/2 tsp Salt

1 level tsp Bicarbonate of soda

2 tablespoons Golden syrup

1 dessertspoon Hot water

Step 1

Preheat your oven at 350F, 180C, 160C for fan ovens, Gas 4. In a large mixing bowl sift together the flour, baking powder, salt and cream of tartar.

Step 2

Beat the margarine and sugar until light and fluffy. Stir in the rolled oats.

Step 3

Dissolve the bicarbonate of soda in the hot water. Warm the syrup and add this and the bicarbonate of soda to the flour mixture. Then mix this together with the oat mixture. Leave to stand for about 20 mins.

Step 4

Place neat teaspoonfuls onto a greased or lined baking tray. Make sure they are spaced apart as they will spread.

Step 5

Bake in the oven for 10-15 mins until golden. Then cool on a wire rack.